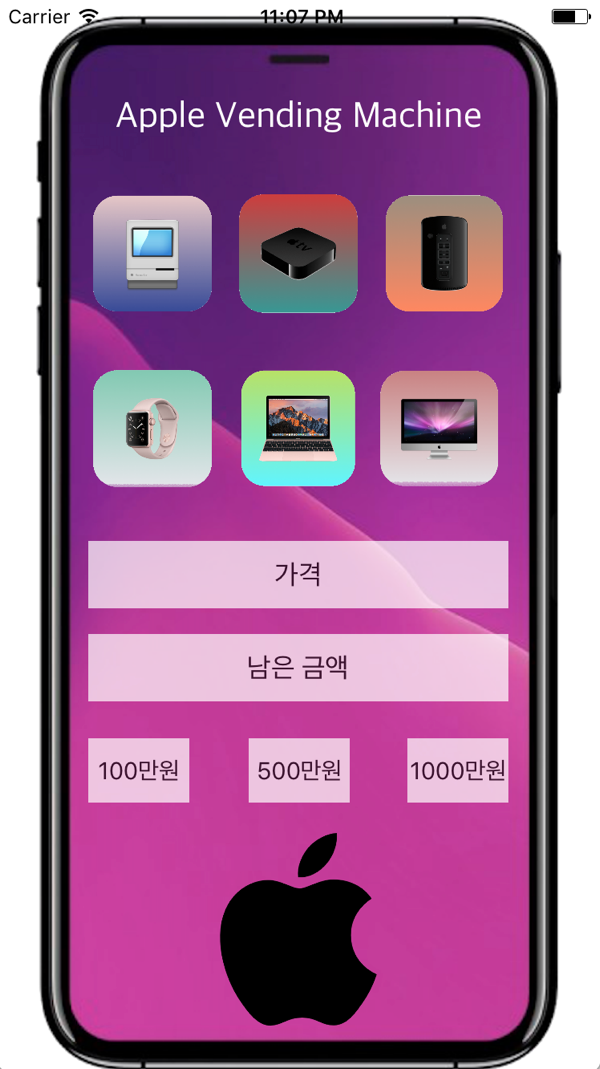
자판기
Written by Tejayon
자판기

- 우선 첫번째 방법으로는 클래스를 쓰지 않고 만들어 보았다. 일단 클래스를 사용하는게 익숙지 않다보니 처음에는 ViewController에 모든 함수를 만들어서 자판기를 만들었다.
//
//  ViewController.swift
//  VendingMachine
//
//  Created by SIMA on 2017. 9. 15..
//  Copyright © 2017년 SIMA. All rights reserved.

import UIKit

class ViewController: UIViewController {
    //mactracker의 가격은 300만원, 애플티비는 50만원, 맥프로는 2000만원, 애플와치는 80만원, 맥북은 200만원, 아이맥은 500만원
    @IBOutlet var itemPrice: UILabel!       //아이템 가격을 나타내는 레이블
    @IBOutlet var remainAmount: UILabel!    //남은 금액을 나타내는 레이블
    var selectItem: String = ""
    var priceView: Int = 0
    var depositMoney: String = ""
    var lackMoney: String = ""

    override func viewDidLoad() {
        super.viewDidLoad()
        // Do any additional setup after loading the view, typically from a nib.

    }

    override func didReceiveMemoryWarning() {
        super.didReceiveMemoryWarning()
        // Dispose of any resources that can be recreated.
    }
    @IBAction func vendingItem(_ sender: UIButton) {
        itemPriceView(btn: sender.titleLabel!.text!)
    }
    @IBAction func moneyInput(_ sender: UIButton) {
        if remainAmount.text! == "남은 금액" {
            remainAmount.text! = "0"
        }
        addMoney(btn: sender.titleLabel!.text!)
    }
    @IBAction func selectItem(_ sender: UIButton) {
        buyItem()
    }
    //아이템을 선택해서 샀을 때 실핼하기 위한 함수
    func buyItem() {
        if Int(remainAmount.text!)! - Int(itemPrice.text!)! >= 0 {
        remainAmount.text! = String(Int(remainAmount.text!)! - Int(itemPrice.text!)!)
        }else {
            lackMoney = remainAmount.text!
            remainAmount.text! = "돈 넣으세요!!"
        }
    }
    //입금 버튼을 눌렀을 때의 함수
    func addMoney (btn: String) {
        if remainAmount.text! == "돈 넣으세요!!" {
            remainAmount.text! = lackMoney
        }
        depositMoney = btn
        switch depositMoney {
        case "100만원" :
            remainAmount.text! = String(Int(remainAmount.text!)! + 1000000)
        case "500만원" :
            remainAmount.text! = String(Int(remainAmount.text!)! + 5000000)
        case "1000만원" :
            remainAmount.text! = String(Int(remainAmount.text!)! + 10000000)
        default :
            print("a")
        }
    }
    //아이템 가격을 눌렀을 때 반응하는 함수
    func itemPriceView (btn: String) {
        selectItem = btn
        switch selectItem {
        case "mactracker" :
            itemPrice.text! = "3000000"
        case "appletv" :
            itemPrice.text! = "500000"
        case "macpro" :
            itemPrice.text! = "20000000"
        case "applewatch" :
            itemPrice.text! = "8000000"
        case "macbook" :
            itemPrice.text! = "2000000"
        case "imac" :
            itemPrice.text! = "5000000"
        default :
            print("a")
        }
    }
}
- 클래스를 이용해서 자판기를 다시 작성해보았다. 우선 스위프트 파일을 새로 만들어 machine이라는 클래스를 만들어 필요한 프로퍼티와 매소드를 만들어 작성 했다. 그 결과 전에 만들었던 코드보다 훨씬 깔끔하게 작성할 수 있었다.
— ViewController.swift
//
//  ViewController.swift
//  VendingMachine
//
//  Created by SIMA on 2017. 9. 15..
//  Copyright © 2017년 SIMA. All rights reserved.
//

import UIKit

class ViewController: UIViewController {
    //mactracker의 가격은 300만원, 애플티비는 50만원, 맥프로는 2000만원, 애플와치는 80만원, 맥북은 200만원, 아이맥은 500만원
    @IBOutlet var itemPrice: UILabel!       //아이템 가격을 나타내는 레이블
    @IBOutlet var remainAmount: UILabel!    //남은 금액을 나타내는 레이블
    @IBOutlet var priceWon: UILabel!        //가격 뒤에 "원"을 나타내기 위한 레이블
    @IBOutlet var remainWon: UILabel!       //남은 금액 뒤에 "원"을 나타내기 위한 레이블

    let machine: Vending = Vending()        //클래스 초기화

    override func viewDidLoad() {
        super.viewDidLoad()
        // Do any additional setup after loading the view, typically from a nib.
        priceWon.text! = ""                 //레이블 초기 값은 없음
        remainWon.text! = ""                //레이블 초기 값은 없음
    }
    override func didReceiveMemoryWarning() {
        super.didReceiveMemoryWarning()
        // Dispose of any resources that can be recreated.
    }
    //아이템을 눌렀을 때 가격이 나오게 하는 함수
    @IBAction func vendingItem(_ sender: UIButton) {
        itemPrice.text! =  machine.itemPriceView(btn: sender.titleLabel!.text!)
    }
    //입금 버튼을 눌렀을 때 남은 금액 가격 레이블을 변화시키는 함수
    @IBAction func moneyInput(_ sender: UIButton) {
        if remainAmount.text! == "남은 금액" {
            remainAmount.text! = "0"
        }
        remainAmount.text! =  machine.addMoney(remainButton: remainAmount.text!, depositButton: sender.titleLabel!.text!)
    }

    //아이템을 선택해서 샀을 때 남은 금액의 레이블을 변화시키기 위한 함수
    @IBAction func selectItem(_ sender: UIButton) {
        remainAmount.text! = machine.buyItem(remainButton: remainAmount.text!, priceButton: itemPrice.text!)
    }
}
— Vending.swift
//
//  Vending.swift
//  VendingMachine
//
//  Created by SIMA on 2017. 9. 16..
//  Copyright © 2017년 SIMA. All rights reserved.
//

import Foundation

class Vending {
    var lackMoney: String = ""      //돈이 부족했을 때 가지고 있던 금액을 따로 저장하기 위한 변수

    init() {

    }
    //아이템을 선택해서 샀을 때 실핼하기 위한 함수
    func buyItem(remainButton: String, priceButton: String) -> String {
        var tmpRemainButton: String = remainButton
        if tmpRemainButton != "돈 넣으세요!!" && tmpRemainButton != "남은 금액" {
            if Int(tmpRemainButton)! - Int(priceButton)! >= 0 {
                tmpRemainButton = String(Int(tmpRemainButton)! - Int(priceButton)!)
            }else {
                lackMoney = remainButton
                tmpRemainButton = "돈 넣으세요!!"
            }
        }
        return tmpRemainButton
    }

    //입금 버튼을 눌렀을 때의 함수
    func addMoney (remainButton: String, depositButton: String) -> String{
        var tmpRemainButton: String = remainButton
        if tmpRemainButton == "돈 넣으세요!!" {
            tmpRemainButton = lackMoney
        }
        switch depositButton {
        case "100만원" :
            tmpRemainButton = String(Int(tmpRemainButton)! + 1000000)
        case "500만원" :
            tmpRemainButton = String(Int(tmpRemainButton)! + 5000000)
        case "1000만원" :
            tmpRemainButton = String(Int(tmpRemainButton)! + 10000000)
        default :
            print("a")
        }
        return tmpRemainButton
    }

    //아이템 가격을 눌렀을 때 반응하는 함수
    func itemPriceView (btn: String) -> String{
        var tmpItemPrice: String = ""
        switch btn {
        case "mactracker" :
            tmpItemPrice = "3000000"
        case "appletv" :
            tmpItemPrice = "500000"
        case "macpro" :
            tmpItemPrice = "20000000"
        case "applewatch" :
            tmpItemPrice = "8000000"
        case "macbook" :
            tmpItemPrice = "2000000"
        case "imac" :
            tmpItemPrice = "5000000"
        default :
            print("a")
        }
        return tmpItemPrice
    }
}


