UINavigationController
Written by Tejayon
UINavigationController
1. Container View Controller
-
View Controller의 Container 역할을 하는 View Controller
-
View Controller 간의 구조를 잡는 역할을 한다.
-
일반적으로 Root View를 가지고 있지 않고 View Controller를 Sub View Controller로 가지고 있다.
-
종류
- UINavigationController
- UITabbarController
- UISplitViewController
2. UINavigationController
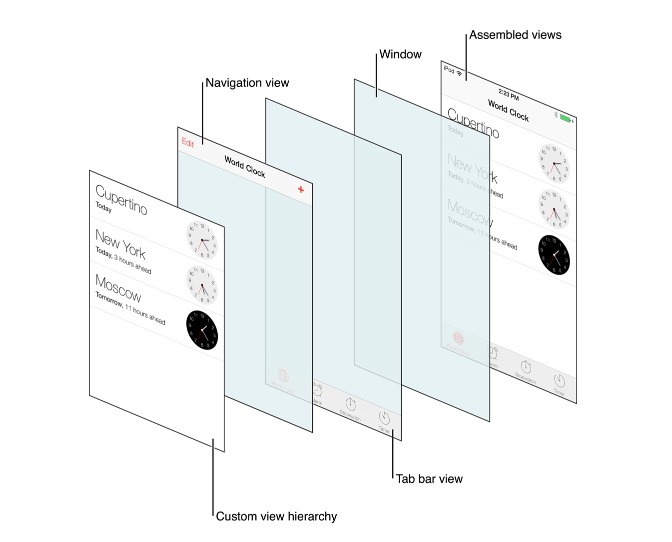
- UINavigationController는 계층적 컨텐츠를 탐색하기 위해 스택기반으로 구성된 Container View Controller
- NavigationController는 네비게이션 구조 내에 하나 또는 여러개의 Child View Controller 관리하는 Container View Controller이다. 이 구조 내에서 Child View Controller는 한번에 하나씩만 볼 수 있다.
- View Controller 내의 어떤 이벤트를 통해 새로운 View Controller를 Push를 하게 되면 이전의 View Controller는 새로운 View Controller에 의해 가려지게 된다.
- 그리고 새로운 View Controller에서 Back 버튼을 눌러 pop을 하게 되면 현재의 ViewController는 제거되고 이전에 View Controller가 보이게 된다.
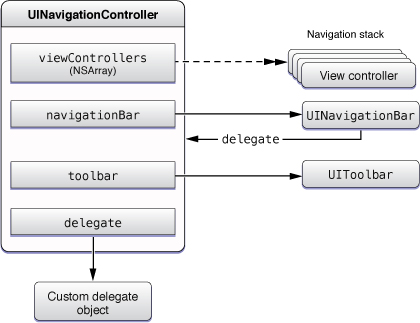
- UINavigationController의 구조는 ViewControllers(Array)와 NavigationBar Toolbar로 이루어져 있다.
- NavigationBar를 통해 ViewController의 상태를 관리한다.
- UIToolBar가 제공되며 기본 hidden 상태로 존재한다.
3. NavigationController 생성
-
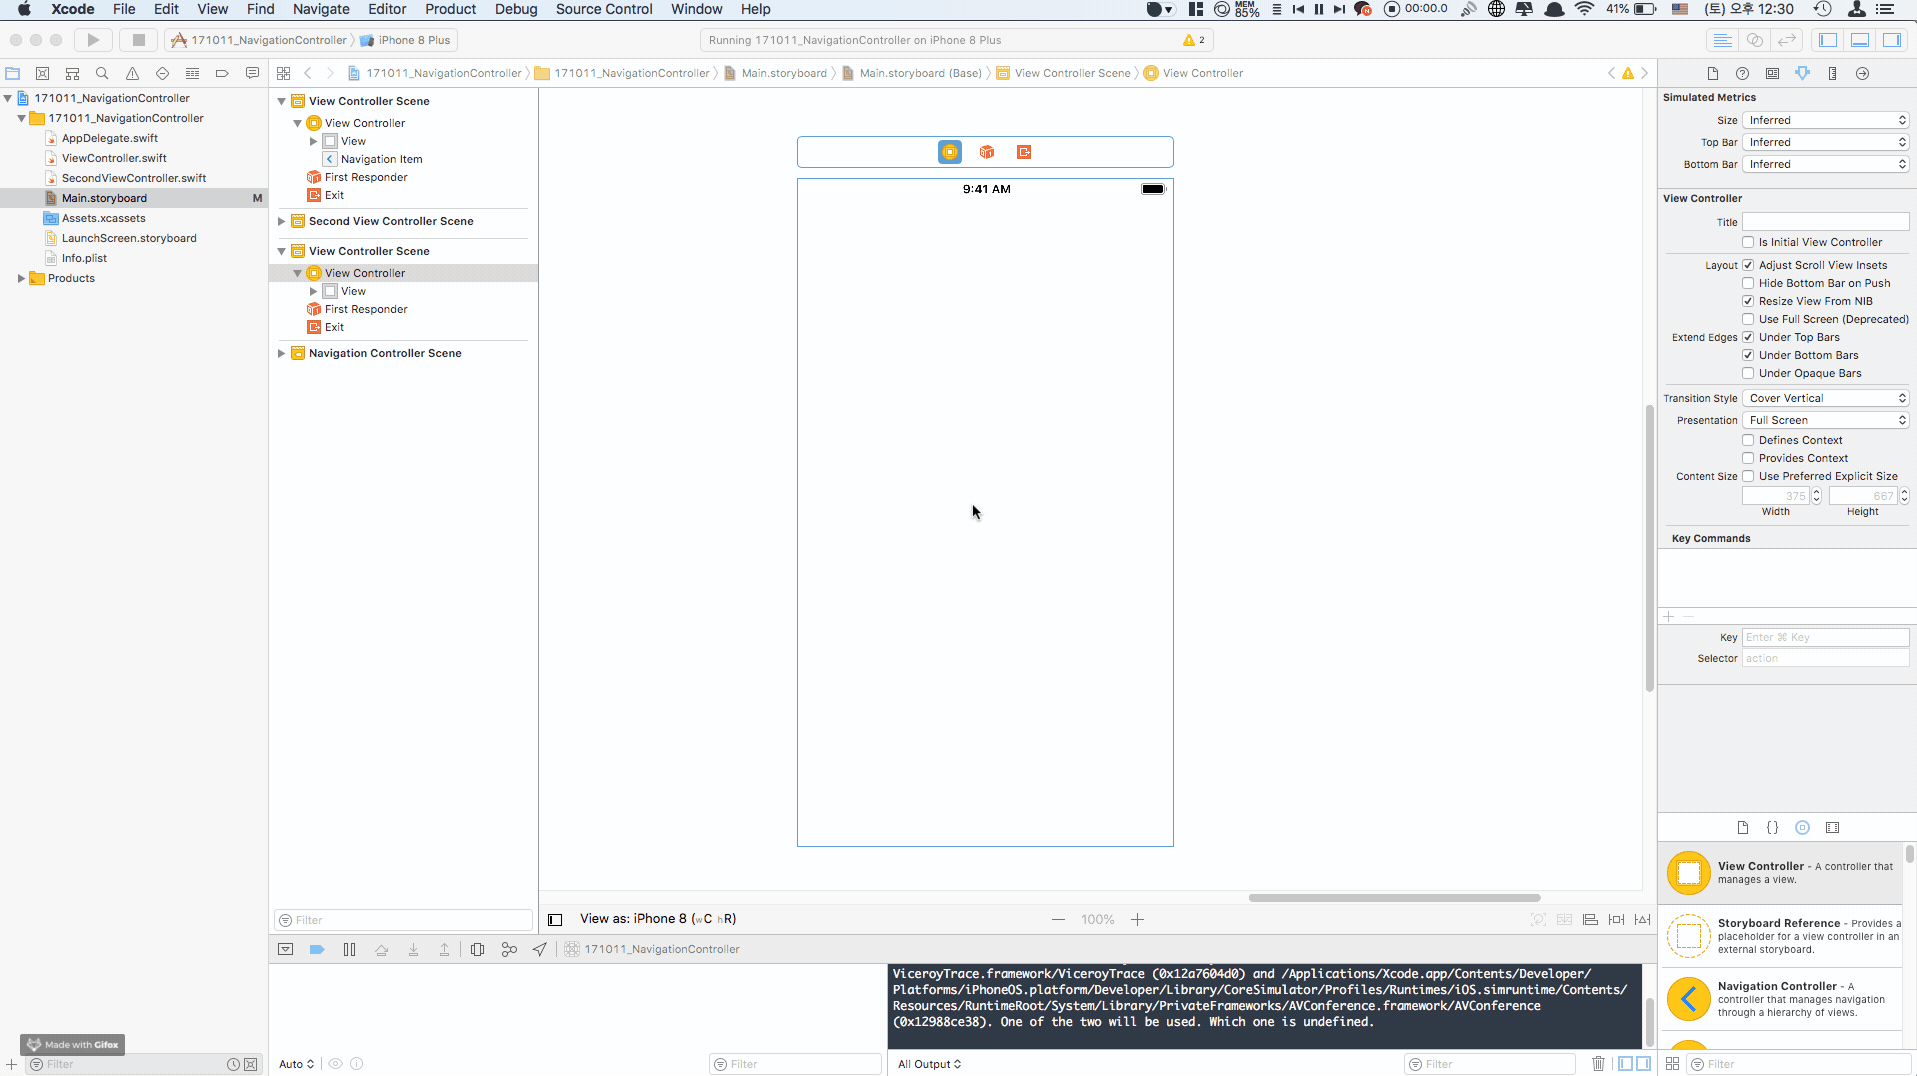
Using Storyboard(Embed)
- ViewController선택
- Editor -> Embed in -> Navigation Controller
-
Using Storyboard(Object Select)
- UINavigationController Drag and Drop
- RootViewController 설정
-
Code
let vc = UIViewController() let naviVC = UINavigationController(rootViewController: vc)- ViewController instance 만드는 코드는 생성 과정에 따라 달라진다.
- RootViewController는 꼭 초기화시 선택해야 하며, 그 후 변경이 불가능합니다.(rootViewController 프로퍼티 존재하지 않음)
- NavigationController 구조는 보통 AppDelegate에서 생성하나 앱의 구조에 따라 중간에도 진입 가능
- UINavigation 구조를 중첩해서 만들 수 없음
4. NavigationController 화면전환
-
Segue
- Storyboard의 Segue를 통해 이동가능(Show = Push)
- pop의 경우 unwind Segue를 사용해서 돌아간다.
-
Code
- UIViewController의 navigationController 프로퍼티를 사용해서 속해있는 navigationController에 접근 가능하다.
open var navigationController: UINavigationController? { get }- pushViewController() 메소드와 popViewController() 메소드를 통해 화면 전환이 가능하다.
open func pushViewController(_ viewController: UIViewController, animated: Bool) open func popViewController(animated: Bool) -> UIViewController? -
프로토콜타입으로 사용가능하다.
let winner:Runable = racing(animals: [Dog(),Horse()])
5. NavigationController 실습
import UIKit

class myCell: UITableViewCell {
    @IBOutlet weak var titleLB: UILabel!
}


class ViewController: UIViewController, UITableViewDataSource, UITableViewDelegate {

    @IBOutlet weak var table: UITableView!

    override var prefersStatusBarHidden: Bool { return true }

    var heightArray:[Bool] = []

    override func viewDidLoad() {
        super.viewDidLoad()

        for _ in 0 ... 19 {
            heightArray.append(false)
        }

        table.rowHeight = UITableViewAutomaticDimension

        self.navigationController?.navigationBar.prefersLargeTitles = true

        let pushBtn = UIButton()
        pushBtn.setTitle("Next", for: .normal)
        pushBtn.setTitleColor(.black, for: .normal)
        pushBtn.addTarget(self, action: #selector(self.pushButtonHandler(_:)), for: .touchUpInside)

        let rightLB1 = UILabel()
        rightLB1.text = ">"
        rightLB1.textColor = .black

        let rightLB2 = UILabel()
        rightLB2.text = ">"
        rightLB2.textColor = .black

        let rightLB3 = UILabel()
        rightLB3.text = ">"
        rightLB3.textColor = .black

        self.navigationItem.rightBarButtonItems = [UIBarButtonItem(customView: rightLB1),
                                                   UIBarButtonItem(customView: rightLB2),
                                                   UIBarButtonItem(customView: rightLB3),
                                                   UIBarButtonItem(customView: pushBtn)]

        self.navigationItem.title = "HomeView"
    }

    func tableView(_ tableView: UITableView, estimatedHeightForRowAt indexPath: IndexPath) -> CGFloat {
        return UITableViewAutomaticDimension
    }

    func tableView(_ tableView: UITableView, numberOfRowsInSection section: Int) -> Int {
        return heightArray.count
    }

    func tableView(_ tableView: UITableView, cellForRowAt indexPath: IndexPath) -> UITableViewCell {
        let cell = table.dequeueReusableCell(withIdentifier: "myCell", for: indexPath) as! myCell

        if indexPath.row < 10 {
            cell.titleLB.text = "\(indexPath.row) long"
        }else {
            cell.titleLB.text = "\(indexPath.row) long long long long long long long long long long long"
        }

        if heightArray[indexPath.row] {
            cell.titleLB.numberOfLines = 0
        }else {
            cell.titleLB.numberOfLines = 1
        }
        return cell
    }

    func tableView(_ tableView: UITableView, didSelectRowAt indexPath: IndexPath) {

        if heightArray[indexPath.row] {
            heightArray[indexPath.row] = false

        }else {
            heightArray[indexPath.row] = true

        }

        tableView.reloadRows(at: [indexPath], with: .automatic)

    }

    @objc func pushButtonHandler(_ sender: UIButton) {
        goToNextVC()
    }

    private func goToNextVC() {
        let nextVC = self.storyboard?.instantiateViewController(withIdentifier: "SecondViewController") as! SecondViewController
        self.navigationController?.pushViewController(nextVC, animated: true)
    }

    func nextAction() {
        let nextVC = UIViewController()
        self.navigationController?.pushViewController(nextVC, animated: true)
    }

    func popAction() {
        let popVC = UIViewController()
        self.navigationController?.popToViewController(popVC, animated: true)
    }

}
-
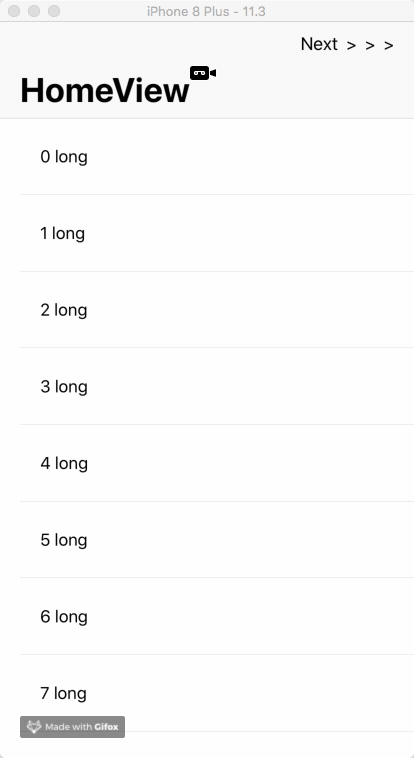
실행시 화면
6. NavigationBar
- Navigation interface를 관리하는 뷰
- navigationBar의 외관은 customize할 수 있지만 frame, bounds, or alpha values는 절대 직접 바꿀수 없다.
- bar의 높이는 고정이 되어 있다.
- pop이 가능한 ViewController가 있을시 기본 BackItem이 나타난다.
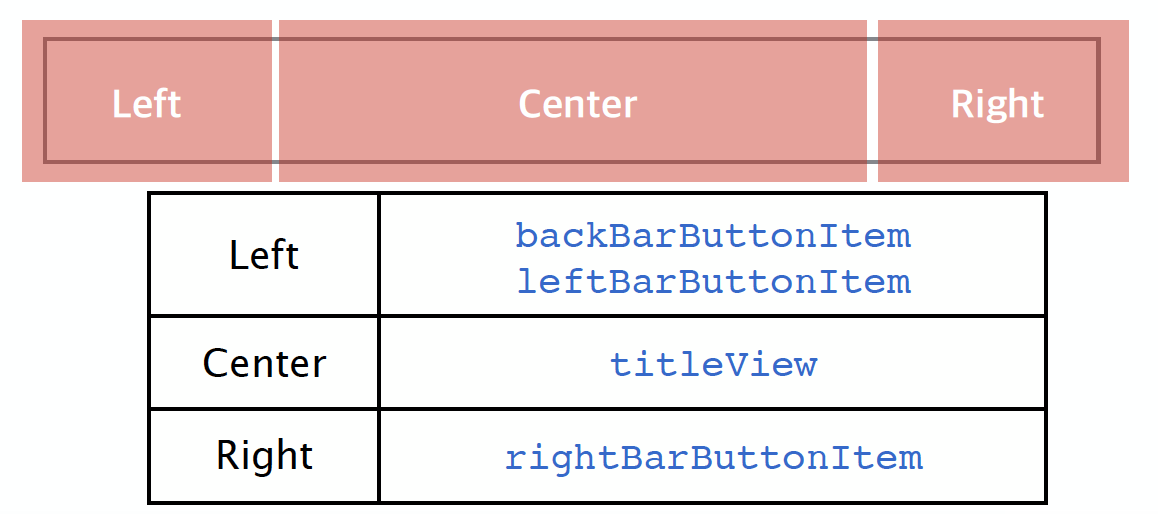
7. UINavigationItem
-
UINavigation의 각 ViewController를 관리하기 위해 만들어지는 인스턴스이다.
-
Navigation에 push시 자동으로 생성된다.
-
각 아이템은 UIBarButtonItem Type의 인스턴스를 할당 받을 수 있다.
-
UIBarButtonItem Instance생성 후 각 프로퍼티에 할당 한다.
-
UIBarButtonItem Instance생성 방법은 상황에 따라 다를수 있다.
-
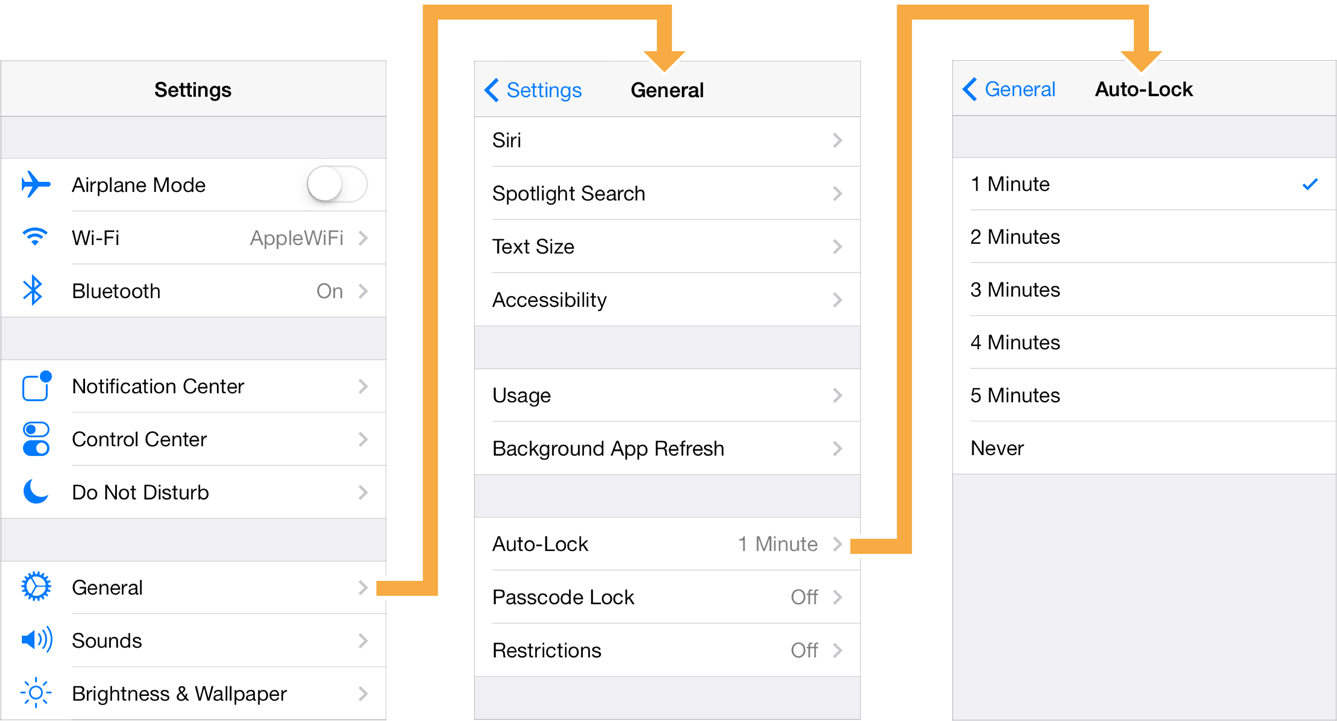
UINavigationItem을 사용하지 않으려면, NavigationBar를 Hidden시켜야 한다.
self.navigationController?.isNavigationBarHidden = false//Left self.navigationItem.backBarButtonItem = UIBarButtonItem() self.navigationItem.leftBarButtonItem = UIBarButtonItem() self.navigationItem.leftBarButtonItems = [UIBarButtonItem(),UIBarButtonItem()] //Center self.navigationItem.titleView = UIView() //Right self.navigationItem.rightBarButtonItem = UIBarButtonItem() self.navigationItem.rightBarButtonItems = [UIBarButtonItem(),UIBarButtonItem()]//커스텀 이미지를 통해 버튼 생성 init(image: UIImage?, style: UIBarButtonItemStyle, target: Any?, action: Selector?) //커스텀 타이틀을 통해 버튼 생성 init(title: String?, style: UIBarButtonItemStyle, target: Any?, action: Selector?) //시스템에서 제공해주는 기본버튼 생성 init(barButtonSystemItem systemItem: UIBarButtonSystemItem, target: Any?, action: Selector?) //커스텀 뷰를 이용해서 버튼 생성 (가장 많이 사용된다) init(customView: UIView)


